Connect one end of the spark plug wire to the large center terminal of the ignition coil. Connect the other end of that wire to the center terminal of the distributor.
Table of contents
- Ignition coil — checking, measuring, faults
- Your Answer
- Your Answer
- Ignition System Basics - Matt Dubanoski
These coils are also filled with oil for temperature control. Look at the ignition coil. These coils have one large terminal for the spark plug wire that runs over to the distributor and two small terminals that supply power to the coil. Connect one end of the spark plug wire to the large center terminal of the ignition coil. Connect the other end of that wire to the center terminal of the distributor cap.
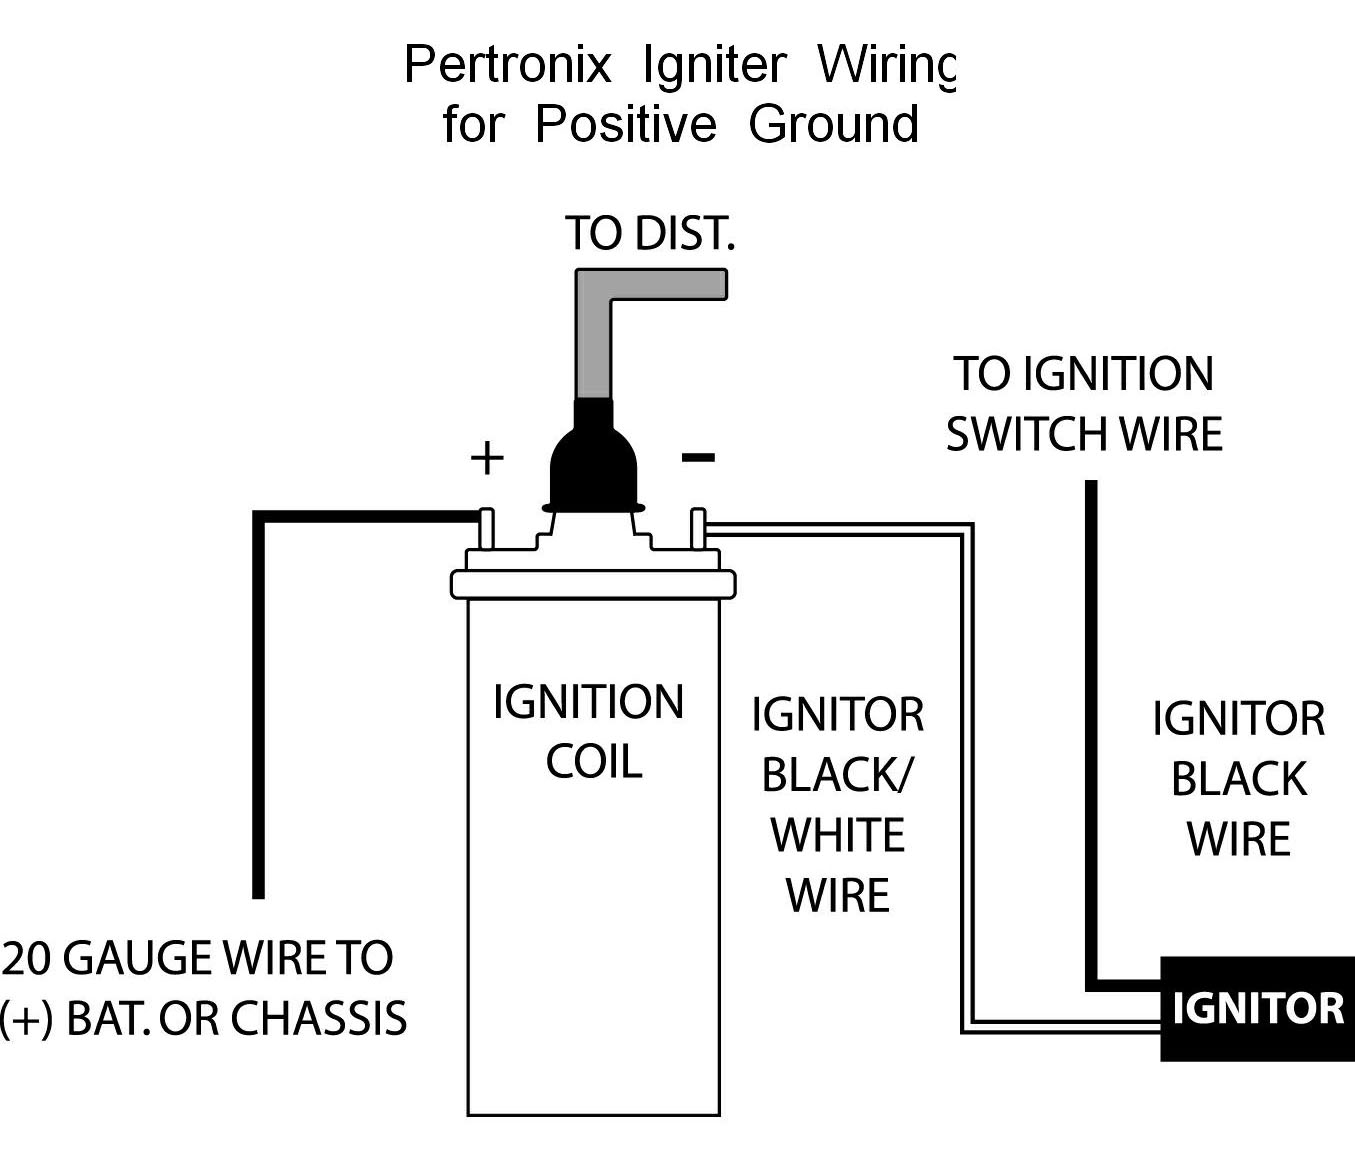
Connect the positive terminal of the ignition coil to the "On" terminal of the ignition switch. Mark the spark plug wires that connect to each coil in order to make installing the new ones easier. Some ignition coils need a right-angled wire connector so the wires fit correctly. Slip the right-angled boot onto the wire and push it up the wire.
Flatten the ignition wire with cutting pliers and needle nose pliers and open up the original copper connector and trim it to fit the reverse side of the right-angled connector.
- How to Install a Motorcycle Ignition Coil;
- dating hunt hollywood u.
- Ignition coil polarity.
Using crimp pliers or needle nose pliers, fold and crimp the connector onto the ignition coil wire. Make sure the small "ear" sections of the connector are embedded into the ignition coil wire. You can also solder the connector into the right-angled connector. Test the connections between the ignition wire and connectors at both ends with an ohmmeter.
Ignition coil — checking, measuring, faults
If one coil has failed, its reading will be zero "open" on the ohmmeter. A voltage of more than In order to check the voltage supply under load, we recommend repeating the measurement while actuating the starter. In order to prevent unnecessary fuel injection, you must remove all the injection valve connectors first. A signal must be clearly identifiable on the oscilloscope.
In this example, the measurement is successful. In order to avoid damaging the spark plug connector, it is essential to avoid rotating the ignition coil. Check the plug slot for soiling caused by oil and water penetration.
Remove and check the spark plugs. Use the multimeter to check the removed ignition coil. In order to measure the secondary coil, measure the probes directly at the high-voltage outputs of the ignition coil. Here, care must be taken that the spark plug connector and the high-voltage cable for the second plug fit properly. Attach the ignition coil using the fixing screws.
Your Answer
Once this is done, insert all the plug connections for the ignition coil and the injection valve connectors. During the diagnostics work, additional faults were detected by the electronic control unit. These must be cleared before the test drive. Carry out a test drive with the diagnostic unit connected. Once this is complete, read out the fault memory again. Always take the vehicle manufacturer's specifications into account during all testing and diagnostic work. Depending on the manufacturer, additional vehicle-specific testing methods may have to be taken into consideration.
- matchmaking server mw2.
- ?
- irani dating sites.
- sam from icarly dating.
During work on electronic ignition systems, contact with live components can result in potentially fatal injuries. This applies not only for the high-voltage live secondary circuit, but also for the primary circuit.
Your Answer
For this reason, testing and repair work should only be carried out by trained specialist staff. Pre-requisite for diagnostics work: US Video Hella team Toggle navigation. From basic knowledge to diagnostic tips for professionals — these pages provide you with HELLA expertise for your day-to-day work. Gain an advantage through knowledge. You and your skills take centre stage for HELLA — this is why we will get you ready for a high-tech future with our training program. Skillfully draw attention to yourself - With our concepts and ideas for marketing, you can showcase yourself as a professional HELLA partner.
Homepage Technical Car electronics and electrics Check Ignition coil Ignition coil — checking, measuring, faults. Ignition coils for ignition systems with rotating high-voltage distribution. A fault can manifest itself as follows: Engine does not start Vehicle misfires Poor acceleration or loss of power Engine control unit switches to limp-home mode Engine warning lamp lights up Fault code is stored. There are different ways of checking the ignition coil: The following checks can be used: Visual inspection Check the ignition coil for mechanical damage Check the housing for hairline cracks and sealant leaks.
Check the electrical wiring and plug connections for damage and oxidation. Alfa Romeo 1. Before starting diagnostics, take into account the following factors: In order to allow correct allocation of the vehicle, it is important that the vehicle documents registration documents are included with the job sheet.
Check the battery voltage.
- If I were to connect an ignition coil directly to a battery | Adventure Rider.
- dating service el paso tx.
- Ignition System Basics;
- How do you wire an ignition coil to a distributor?;
- If I were to connect an ignition coil directly to a battery;
- ;
- netmums dating sites.
Insufficient voltage supply may cause system failure or result in incorrect measurements or voltage drops. Check the system-related fuses. A quick look in the fuse box might eliminate the first cause of the fault.
Ignition System Basics - Matt Dubanoski
The customer has reported a functional problem with the engine control system Warning information on the instrument cluster: Using the diagnostic unit. Carry out the following applications on the diagnostic unit: Select program Select vehicle Select fuel type Select model Select vehicle type Select required function Select system: Depending on which diagnostic unit is being used, additional safety instructions may be displayed here.
Read out the fault memory. In this case, fault PO was stored. Combustion of cylinder 3 Misfire detected in cylinder 3. Determine the fault cause. Preparations for engine diagnostics Prepare any additional diagnostic units that may be necessary, such as a multimeter or oscilloscope Find the technical documents Remove the engine cover if present. Carry out a visual inspection.